Showing posts with label Section 40 - Lighting. Show all posts

Friday, April 21, 2017

PAP G1-G4

I got started today with switching the landing lights wires. I had found that wires #213 & 214 were switched so I relocated them and the landing light is now steady when selected for steady and pulsing when selected for pulsing.

I started working on the PAP's. T helped me some through the process. We went through most of G1. The lights and brakes passed. I did notice the trim moved faster then recommended, so I will have to adjust that. I also noticed that the trim seemed to be moving in the opposite direction as should be. (In further research it may be that the plans on page 31B-04 may be incorrect for the wires in #31 & 32 position.)

Most of PAP G2 was then checked working with the flight controls. The cable tension was re-checked and adjusted,

G3 seats and restraints were checked.

G4 cowl was taken off and throttle, choke, and cabin heat was checked. The spinner was then taken off. An oil purge needs to be performed, so I need to do some research as to how to properly do the purge and what supplies are needed.

During our work day today the boys and S came out for dinner. It was enjoyable having them around. B and S even mowed the lawn for me!

Time: 6.5 hrs


T helping with PAP procedures

Boys Eating dinner

Taking off lower cowl

T and A trying out the plane

B and a friend trying out the plane


B watching a plane go by while mowing

Removing spinner


Thursday, April 20, 2017

Wing lights, Canopy adj., Canopy seal, N#, Start config

It was a good day at the hangar today.  I first started by installing the wing lights and the cover to the landing light.  

I then did some more adjustments on the canopy as I wasn't completely happy with how it closed. I found some more interference on the UL corner of the G3X and did some adjustments to the canopy bar, canopy, and corner of G3X. I also had to make some minor adjustments to the canopy latch handle to allow it to close without to much strain. It seemed to be positioned about 1/8" too high which caused it to angle down when trying to latch. So I position it a little lower to make it more level when latching. I also slightly hammered with a wood block the left side skin (turtle neck) edge to allow the canopy to close better on the left side. At this point I think I am happy with how it closes now.

I also verified the wing gap that is required for the wing seal. The instructions say to not install seal until after paint to I will delay installation of seal for now. There were a few areas that needed some adjustment.

I then tried in the canopy seal retainer. Small adjustments were made on the retainer and then it was primed and painted.

The N#'s were then installed on the vertical stabilizer.

Then onto the next BIG step: Turning on power. I hooked up the ground cable to the battery. I then turned on the master switch. The G3X booted up and the fuel pump was running. I turned off the master and removed the fuel pump fuse. I started going through some of the steps of PAP G1.  I tested the lights. They all work except the Landing light pulse and steady are reversed, so I will have to switch the wiring at the light (should be a simple fix). I then starting installing the config files as per PAP and read.me file. Garmin software version 5.30 was installed and then RV12 base config file R10 and Autopilot R2 was installed.  There is more configuring such as the ADAHRS, Magnetometer, etc., but that has to be done after engine start.  Oh and but the way, the G3X looks awesome! 

Time: 5 hrs.

Left wing light installed

Right wing light installed

Landing light cover

N# placed

G3X first start
Light switches


Monday, April 17, 2017

Wing light extensions

Worked on the wing light extensions. Started by clecoing the extension then adding electrical tape around the lower edge. Fuel sealant was then place under the lower edge and then the extension riveted as per plans.  I also loaded and secure the work benches and got all the other supplies and tools ready to go to the hangar.

Time: 2 hrs

Taping around wing extensions

Fuel sealant added

Work benches loaded


Friday, March 31, 2017

Bleed Brakes / ELT / Fuel Tank

Another day and tackling several different aspects of the build, hoping to get it ready to move to the hangar soon.

I started out with the help of N to get the brakes bleed. After doing a little research online and EAA videos I chose to bleed the brakes using an oil can and hand pumping the fluid from the bottom up. This worked out fairly well. It took a little work getting air bubbles to completely resolve through the cylinders, but it was accomplished. Overall it worked out better than I imagined. And no visible leaks found so far.

I then installed the batteries on the ELT remote and audio alert. The remote was then installed in the panel.

The canopy light was installed. The fuel tank was installed along the the neck. The plans called for fuel sealant to be placed between the neck and the turtle skin, so fuel sealant was mixed and placed prior to setting the screw of the fuel neck.

Time: 4 hrs

Bleeding of brakes

Brakes bleed

ELT remote installed

Canopy light installed

Fuel tank installed

Fuel sealant around fuel inlet


Wednesday, October 14, 2015

River gun repair / rudder pedals

So the parts for the rivet gun arrived today.  I spent 45 minutes replacing that parts, gun didn't work.  I then thought that I needed to recharge the hydraulics, so I went through the steps and it still didn't work.  I have come to the conclusion that I don't know how to repair a rivet gun.  I am sure there is something simple I have to do, but rather then spend more time repairing a gun when I could be building I decided I would send it in for repairs.  It will take 3-4 weeks to get it back, but in the meantime there are other sections I can be working on.  I would rather hold off riveting the sides until I have the gun as it would be a lot faster then by hand.

I worked on the rudder pedals and brakes some more. The other pedals were drilled and the pedal blocks and brake cylinders installed.

I clecoed the rollbar and braces to the fuselage. I then enlarged the hole in the roll bar attach plates for the canopy light wiring.


Time:  3 hrs

Match drilling pedals

Grease used on brake pedals

Pedal blocks

Roll bar and brace riveted

Hole enlarged for Cockpit light wiring


Tuesday, October 6, 2015

Cockpit light bracket, seat backs, paint samples

Since I am waiting on the longeron dies to complete the longerons, I decided to work on some other items.  I first prepared the roll bar for the cockpit light bracket.  I will probably wait to unstall it until after I have painted the roll bar.

Speaking of paint, I have been trying to decide on what paint to use on the inside.  I am planning at this point to order the interior carpets and sides including in that baggage area, so not a lot will be visible, but at the same time it would be nice to have the interior all painted just in case I don't get the interior kit and just because it would be good to have a consistent color under the carpet.  I tried a few sample on the trim tabs that were deformed.  The 4 I tried were Rustoleum brands: 1. Dark machine grey, grey hammered, black hammered, and black textured.  I also tried a matt overcoat on half of some of them to see how the matt finish would look.  My conclusion is that the texture didn't go on well.  Probably because I didn't practice with it enough. And although it can look good, I worry about the rough finish and cleans-ability. The hammered looked pretty good as far as texure with the first coat, but the second coat the hammered finished was reduced some.  The dark machine grey went on well.  So at this point I will most likely use the dark machine grey for the bulk of the inside with possibly some other colors for accents in areas.  The panel I will probably use the dark hammered or possibly to a carbon panel.  I will wait to decide that later.

I decided to go ahead and work on the seat backs since they wouldn't take long and would fill some time as I wait to proceed with the longerons. All the seat back parts were prepared.  Several hinges were fabricated and match drilled. The parts were clecoed together and ready for riveting.

Time: 2.5 hrs.

Cockpit light bracket
Interior paint samples

Seat back parts prepped

Seat back brace

Seat back cleoed


Thursday, June 25, 2015

Light extension brackets/ wiring

 After a couple weeks of being out of town it was time to get back to the RV12 project.  My wife will be picking up the Fuselage kit from Vans tomorrow so I need to finish as much as I can on the lighting kit today.  The light extensions were drilled for the light brackets and the holes made for the wiring. The light brackets were then attached.  The wiring was completed by adding molex connectors and housings to the wires in the wing and the wires on the light. I will connect them together at a later time.  I will also wait to rivet the light extensions until later as it calls for fuel tank sealant to be used around the edges. I will do it together later when other parts need the sealant also.

Time: 1.75 hrs.

Light extensions drilled and hole made for wiring.

Ligh Bracket attached to light extension

Molex connector attached to wiring.

Molex connector attached to light wiring.


Monday, June 8, 2015

Light extension clay removal

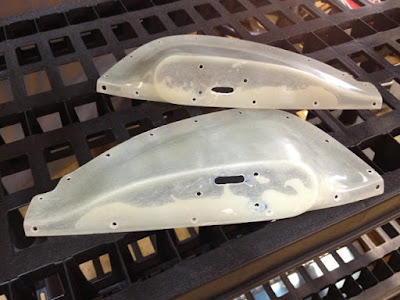
 I had a few minutes to remove the clay in the wing light extension and shape out the resin around where a future nut will be.

Time: 0.25 hrs.

Wing extensions after removal from wing. Clay still present.

Friday, June 5, 2015

Light extension

Worked on light extensions today. First trimmed the extensions to scribed line. The extensions were then clecoed to the wings and the holes drilled.  I then applied car wax to the wing in preparation for adding the filler resin on the extension. The resin was then mixed, added to the wing extensions and then clecoed to the wing.

Time: 2.25 hrs.

Light Extensions Trimmed

Drilling light extensions

Light Extension Clecoes

Light extensions

Waxing for light extensions resin

Resin in light extension

Light extensions filled with resin

Light extension filled with resin


Friday, May 22, 2015

Landing light finish/ R. Wing top skin

Good progress was made today on the right wing. I had the help of T and N at times during the day. We first installed the landing light. That was a little tricky. We had to pay close attention to the instructions as the bolt to use is not the bolt the comes with the light. Took me a few minutes to figure that one out. Getting the landing light bolted in was also a little tricky. I can see how it would definitely be a difficult task if done after the wings were completed. It is not something that I want to have to mess with much in the future.  While installing one of the wires came loose from the molex connecter. I replaced the connector and decided to place some electrical tape in a few places to assure that the likelihood of disconnection would be reduced. We then tried in the landing light cover. It fit nicely. I took it off for now as I do not want to worry about it getting damaged during the rest of the construction process. I will install it towards the end before getting ready for first flight.

After the landing light was installed we then worked on the upper wing skins. With 3 sets of hands all 3 upper skins and the doubler was able to be installed.

Time: 3.5 hrs

Landing light isntalled

Landing light inside view
T and N working on top skins

Top skins complete.


Thursday, May 21, 2015

Landing light backing strips

Worked some with N getting the landing light ready for install. I had to wait for #6 dimple dies to arrive so that I could dimple the skin for the landing light cover. They arrived today, so we dimple the 8 holes for the landing light cover. We then countersunk the landing light cover and added nutplates to the back straps. The landing light ribs were installed. Molex connectors were placed and the landing light wires were connected.  It took a little bit to get the molex housings to connect due to the not exact alignment of the pinsm, but it was finally accomplished. 

Time: 1.5 hrs

Nutplates on back straps
Left landing light rib installed

Right landing light rib installed

Landing light wired.