Showing posts with label Section 06 - Vertical Stabilizer. Show all posts

Thursday, January 15, 2015

Vertical stabilizer completed

T and I worked this afternoon at getting the vertical stabilizer riveted and completed today.

We then spent some time priming the rudder components.

Time: 3 hours. 

T. Reaming holes for rivets

T. Riveting VS

Completed Vertical Stabilizer


Wednesday, January 14, 2015

Vertical Stabilizer Skeleton / Skin

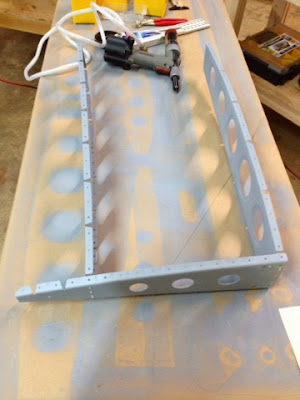
More progress on the vertical stabilizer. I riveted the VS skeleton then riveted nutplates to the skin. It was a little tricky getting the rivets to go properly and had to remove a few at first. I was able to get the right placement if the main squeeze in order to get nice flag rivets and the rest seemed to go in well.

I decided to try and leave the plastic on the skins for now. I rounded off the tip of my soldering iron and using a straight edge was able to remove just the plastic around where the rivets will go. The plane will be roughened up for paint anyways, but I would like to keep it from getting too scratched up during the build. 

I clecoed the VS skin to the skeleton. It is all ready to rivet. 

Time: 2.5 hours. 
VS skeleton

VS skeleton

VS skin nutplate

VS skeleton clecoed and ready for riveting


Monday, January 12, 2015

Priming and First Rivet


We were able to spend some time today and actually put some parts together.  My new pop rivet gun, the Proset 1600, came in the mail today.  This was highly recommended by Wally at Synergy Air.  I know I could have spent $40 for a harbor freight gun and would have probably been fine, but with 12,000 plus rivets to place this one will make it more enjoyable I am sure.

I wiped down the VS skeleton parts with acetone and then sprayed them with NAPA 7220 primer. While that was drying N. and I started working on the rudder spar and ribs. we were able to get them drilled and deburred.

After dinner we went back to the shop and the primer seemed to be set enough to start riveting. We then placed our FIRST rivet of our RV-12. All five of us (the younger two were already in bed) were able to place a rivet on the hinges that attach to the VS.   The first parts of the airplane are not attached.

We had a little time so S. and I worked on getting the VS skeleton put together.  I had the first opportunity to remove a rivet while attaching nutplates to the VS spar. We had the nutplate clecoed at one end but must have moved before we riveted, as when I went to place the second rivet the nuteplate was not attached.  There was just a rivet in the spar. No problems though, I simply drilled out the rivet and placed a new one.  I am sure this won't be the last time I have to drill out a rivet.

Time: 2.5 hrs

New Pop Rivet Gun

Spraying Primer

Rudder Spar

Deburring Holes in Rudder Ribs

FIRST Rivet!!

FIRST Rivet!

S.'s first rivet

T.'s first rivet

N.'s first rivet

K.'s first rivet

Hinges riveted together

Riveting VS Spar

Start of VS skeleton


Saturday, January 10, 2015

More vertical stabilizer work / Primer decision


Worked today some more on the vertical stabilizer. S. helped me this evening.  We got rest of the vertical stabilizer skeleton drilled, countersunk, deburred, scuffed and clean for primer.  We also started working on the VS skins with final drill and dimpling.

After debating in my mind whether to prime or not, I have decided to go ahead and at least prime the small parts and matting surfaces.  I may go ahead and prime the complete ribs and spars since it wouldn't take too much more work. I did not want to go through work and dangers of using an epoxy primer, so a self etching primer seemed a better fit for me. I was going to try and use SEM self-etch primer since some people seem to like the finish of it better, but couldn't find any locally.  Most of the builders around here that do prime seem to be using the NAPA 7220 Self etch primer and I was able to find it easily at the local NAPA store. I won't get to the priming until next week so we will see how it goes.  I will most likely switch to something else when we start the fuselage since it will have a better tendency to get scratched.

Hours: 3 hours
Deburring VS ribs

Scuffing parts to get ready for primer

Dimpling VS skin
Primer that I will be using (at least for now)


Friday, January 9, 2015

Tools arrived! Construction started!

Tools arrived today from Cleaveland tools. We spent about an hour to inventory and organize them and then we started on the construction on the vertical stabilizer. We drilled and deburred the hinges, rear spar, and spar caps. T. was a good help with the deburring. 

I am waiting to start riveting until I decide whether to prime or not.  There is a lot of debate over the priming issue and I have yet to decide what would be best for my situation.  Priming would potentially help prevent corrosion and resale value, but it does require more time and would add weight to the airplane. Hopefully I can make up my mind soon.

Time: 3.5 hrs.

Cleaveland Tools
T. deburring edge


Hinges clecoed together
Vertical spar clecoed.

Thursday, January 8, 2015

Cutting parts

Spent a little time today cutting apart parts that are needed in the first few sections of the Vertical Stabilizer. Tools should be here tomorrow, so then we can really get started. 

Time: 1 hour.
Hings Parts

Cutting with band saw