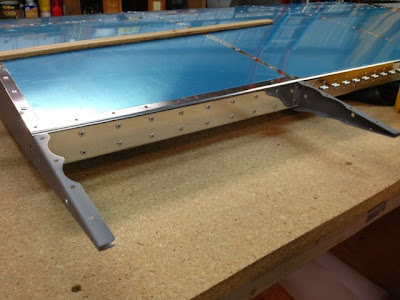
I had some good help from B today in finishing the stabilator. We began by match drilling the skin splice plate. We then riveted the aft hinges to the stabilator. The aft skins and ribs were then riveted. I rolled the forward edge of the aft skins to have tight contact with the forward skin. We then installed the upper and lower horns. We finished it off by attaching the weights to the counterbalance arm. We tried it in the stabilator and then removed it for better storage until we start putting all the sub components together.
This is a log of the build of a Vans RV-12, kit #120895. This will be my first experience in aircraft construction and I hope to learn a lot along the way.
Showing posts with label Section 09 - Stabilator. Show all posts
Showing posts with label Section 09 - Stabilator. Show all posts
Monday, February 2, 2015
Saturday, January 31, 2015
Stabilator skins
This morning I spent about 1.5 hrs clecoing the stabilator skins to the skeleton. This afternoon with the help of S and B we were able to rivet both of the skins to skeleton in about 45 minutes. We worked very efficiently together. It is nice to have good help at these stages of the project.
Time: 2.25 hrs.
Friday, January 30, 2015
Stabilator skeleton
After over a week from not working on the plane it was good to get back to the project. All the stabilator parts we deburred, prepared for priming, and primed. Both of the stabilator skins were prepared by priming the matting surfaces and deburring edges. The stabilator skeleton was then assembled and the hinges were placed.
Monday, January 19, 2015
Stabilator Spar / nutplates
Spent a little longer than planned placing the nutplates on the stabilator spar. It seemed like some I had to try several times with a few to get them flush. After trial and error I was able to get a system down and finally got them finished.
I attached the counter balance brackets to the front and aft spar and then started riveting the spar together.
Time: 3 hrs.
Saturday, January 17, 2015
Stabilator begins
We got a great start on the stabilator today. The RV 12 has what is called a "stabilator" which is a combination of the horizontal stabilizer and elevator. We deburred and primed all the internal parts. We then worked on drilling of the upper and lower horns and the counter balance arm and bracket. I did not take a picture of the drilling of the counter balance arm. It took quite a bit of time to get the holes drilled in the arm. The tougher metal was harder on the bit and I think dulled the bit quite a bit, but we got the holes drilled. The hard part came in taking the arm and brackets off of the spar. I think the holes drilled leaved enough burr around the hole that the parts stuck together. With a mallet and other tools we were finally able to get them apart. We immediately deburred those holes so we won't have that problem again.
Time: 3.5 hrs.
Time: 3.5 hrs.
Subscribe to:
Posts (Atom)


